
How to Create a Custom ODBC Driver from Scratch

insightsoftware är den mest heltäckande leverantören av lösningar för ekonomichefens avdelning. Vi omvandlar information till insikter och ger företagsledare möjlighet att strategiskt driva sin organisation framåt.

Connecting a standard reporting tool such as Excel, QlikView, or Tableau with a data source can be challenging because there are hundreds of new data sources being created that companies like Tableau or Microsoft just do not have the bandwidth to build separate connectors for. What do you do if you want to connect from Excel, QlikSense, Tableau, etc., to your very special data source? You write a custom ODBC driver.
What is a Custom ODBC Driver?
A Custom ODBC (Open Database Connectivity) Driver is a specialized software tool designed to connect applications with databases that may not be supported by standard ODBC drivers. While typical ODBC drivers provide a universal interface for accessing a wide variety of databases, a custom ODBC driver is specifically developed to meet the unique needs of a particular database or application. This might involve handling proprietary data formats, optimizing performance for specific queries, or ensuring compatibility with non-standard protocols. Custom ODBC drivers are often necessary when working with specialized or in-house databases that require tailored solutions to ensure efficient and secure data exchange. By using a custom driver, businesses can address specific operational requirements, ensuring that their applications can interact seamlessly with their databases, even in complex or non-standard environments.
What's the Difference Between an ODBC Driver and a Custom ODBC Driver?
The primary difference between a standard ODBC driver and a custom ODBC driver lies in their scope and specificity:
ODBC Driver: A standard ODBC driver is a generic tool that allows applications to connect to a wide range of databases using a common interface. These drivers are typically provided by database vendors and are designed to work with various applications without the need for customization. They offer a broad level of compatibility but may lack the specific optimizations or features required for certain unique environments.
Custom ODBC Driver: In contrast, a custom ODBC driver is developed to address specific needs that standard drivers cannot fulfill. This could include supporting a proprietary database, enhancing performance for particular queries, or accommodating unique data handling requirements. Custom drivers provide a more tailored solution, offering the flexibility and control needed to meet specialized demands.
Why an ODBC driver?
The ODBC specification defines a rich interface that allows any ODBC-enabled application to connect to a data store. For example, when you look at just about every data source to which Tableau connects, you see most have an ODBC driver that Tableau calls into rather than a native API. Expert tip: Building a Custom Driver – A Caveat Implementing an ODBC driver from scratch is a challenging undertaking, and many initiatives stall out because the ODBC API is very large and complex.
Three Key Considerations For a Custom ODBC Driver
To implement a driver that supports the OBDC specification, developers must understand:
All the complexities of error checking, session management, and data conversion then design their code accordingly – in a robust and efficient manner.
How to optimize data retrieval to get maximum performance when connecting to large and complex data stores.
Cross-platform C/C++ requirements for such a project. And let’s face it, most organizations don’t have this kind of expertise – it’s not easy to find.
There’s an Easier Way
There is a way around this complexity. The SimbaEngine SDK, developed by experts in the field, is a complete implementation of the ODBC specification. It exposes an easy-to-use SDK that allows a user to create a robust and efficient driver for a data store. For data stores that do not support SQL, the SimbaEngine SDK provides an SQL parser and an execution engine. Developers can use these features to translate SQL queries to a custom API or query language that the data store understands.
Get Started: Six Steps to Developing a Custom ODBC Driver Using the SimbaEngine SDK
The following demonstrates how to use the SimbaEngine SDK to create a custom ODBC driver. We’ll connect to the Atlassian Bamboo REST API, a Continuous Integration (CI) and Continuous Deployment (CD) software application that automates software builds and release management. We’ll demonstrate how to accomplish the following development tasks to build the custom driver.
Set up the development environment and build the sample driver
Use the sample driver as a template to create a custom ODBC driver.
We will use Visual Studio and the Microsoft Data Access (MDAC) 2.8 Software Development Kit (SDK) in addition to the SimbaEngine SDK for the build. NOTE: It can be helpful to have some familiarity with C++ and exposure to SQL to follow along with the details of this custom driver build, though it’s not required. Developer Tip: How to build custom drivers in 5 days or less! These guides show you how to modify a QuickStart sample driver written in Java, C#, or C++ to develop your custom driver. See: SimbaEngine SDK 5 days guides.
Step 1. Set up the development environment and build the sample driver
The SimbaEngine SDK includes a sample driver that we will use as a template to create a custom ODBC driver for the data store that is not SQL-capable. The QuickStart driver is a sample DSI implementation of an ODBC driver—written in C++ for our example but as noted above also available in Java and C#—that reads files in tabbed Unicode text format. The Simba SQL Engine is used to perform SQL processing, allowing the QuickStart driver to retrieve data from the sample text files, which are not a SQL-capable data source. Using the QuickStart sample driver to prototype a DSI implementation for a custom data store clarifies how the SimbaEngine SDK works. By removing the shortcuts and simplifications implemented in the QuickStart driver, it can be used as the foundation for a commercial DSI implementation and to create a custom ODBC driver for a data store that is not SQL-capable. We’ll use the following document conventions to improve readability:
Italics are used when referring to book and document titles.
Bold is used in procedures for graphical user interface elements that a user clicks and text that a user types.
Century Gothic font indicates commands, source code, or contents of text files.
NOTE: Indicates a short note appended to a paragraph.
IMPORTANT: Indicates an important comment related to the preceding paragraph.
Related links provide additional information.
Install the SimbaEngine SDK
The first step for setting up the development environment is the installation of the SimbaEngine SDK. Click here for SimbaEngine SDK downloads and documentation.
Build the Sample OBDC Driver
To build the QuickStart sample driver we’ll use the following:
In Microsoft Visual Studio click File > Open > Project/Solution.
In the Open Project dialog navigate to the following folder:
[INSTALL_DIR]\SimbaEngineSDK\10.3\Examples\Source\QuickStart\SourceFor our example we’ll be using Simba for the installation directory.
Select the file QuickStartDSII_VS2022.sln then click Open.
Click Build > Configuration Manager.
Click the drop-down arrow next to the Active Solution Configuration field then select Debug_MTDLL and click Close.
Click the drop-down arrow next to the Active Solution Platform field:
To build a 32-bit driver select Win32.
To build a 64-bit driver select x64. NOTE: 64-bit machines can build both 32- and 64-bit binaries. Most machines these days are 64-bit. We will assume a 64-bit driver on a 64-bit machine for this example going forward. Instructions for 32-bit drivers on 32-bit and 64-bit machines are available in our 5-day guides.
Click Close.
Click Build > Build Solution.
The build appears in the following folder:
[INSTALL_DIR]\SimbaEngineSDK\10.3\Examples\Source\QuickStart\Bin\\<RELEASE|DEBUG><CONFIGURATION>,,
<BUILD> is a combination of the operating system, machine bitness, and compiler.
<RELEASE|DEBUG> is release or debug.
<CONFIGURATION> is mt if MTDLL is selected as the solution configuration, otherwise md
FOR OUR EXAMPLE:
C:\Simba\SimbaEngineSDK\10.3\Examples\Source\Quickstart\Bin\Windows_VS2022\debug64md\QuickstartDSIIODBC64.dllExamine the Windows Registry
Next, we will validate that the SimbaEngine SDK installer automatically added or updated the following registry keys that define Data Source Names (DSNs) and driver locations:
ODBC Data Sources - lists each DSN/driver pair
QuickStartDSII - defines the Data Source Name (DSN). The ODBC Driver Manager uses this key to connect the driver to the database.
ODBC Drivers - lists the drivers that are installed
QuickStartDSIIDriver - defines the driver and its setup location. The ODBC Driver Manager uses this key to connect to and configure the driver.
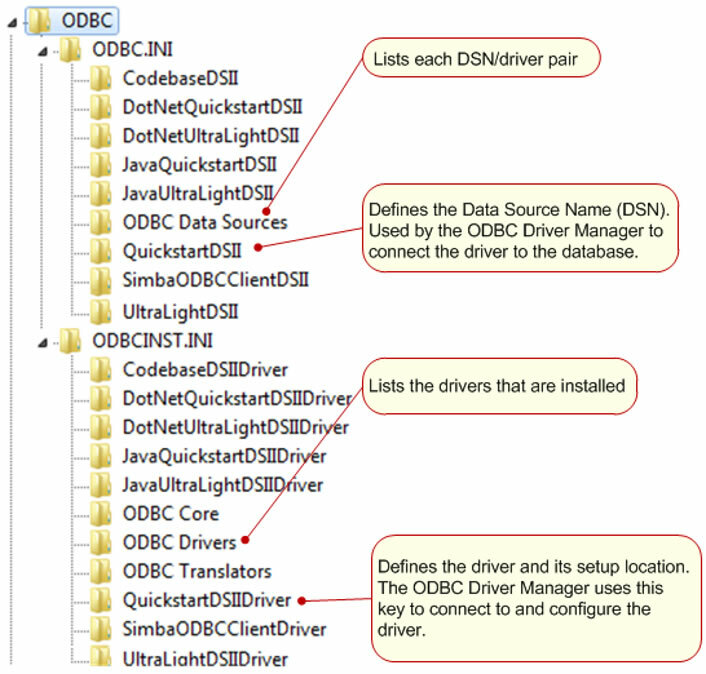
NOTE: The installer for the custom driver will create similar registry keys. NOTE: For 32-bit software on 64-bit machines, there are different registry sections. See the related links section for more details. We’ll follow the steps below to view the registry keys for the QuickStart driver:
From a command line, run run regedit.exe
In the registry editor navigate to the following root directory: HKEY_LOCAL_MACHINE\SOFTWARE\ODBC
View the registry keys as explained in the rest of this section.
ODBC\ODBC.INI\QuickStartDSII key
This key defines the Data Source Name (DSN) for the QuickStart driver. It is located in the Windows Registry at:
HKEY_LOCAL_MACHINE\SOFTWARE\ODBC\ODBC.INI\QuickStartDSII
This key has the following values:
SUBKEY | VALUE | DESCRIPTION |
|---|---|---|
Driver | QuickStartDSIIDriver | The name of the driver to use for connecting to the data store as defined in the |
DBF | [INSTALL_DIR\Examples\Databases\QuickStart\Where [INSTALL_DIR] is the SimbaEngine SDK installation directory. | The path to the data store used by the QuickStart driver. |
Beskrivning | Sample 64-bit SimbaEngine QuickStartDSII | A description of the DSN. |
NOTE: Only the Driver subkey is required for the custom driver: other subkeys may be added later based on what is required to complete a connection for your data source. ODBC\ODBCINST.INI\ODBC Drivers key This key contains one entry for every driver. The entry for the QuickStart driver is: QuickStartDSIIDriver = Installed ODBC\ODBCINST.INI\QuickStartDSIIDriver key This key defines the QuickStart driver. It is located in the Windows Registry at: HKEY_LOCAL_MACHINE\SOFTWARE\ODBC\ODBCINST.INI\QuickStartDSIIDriver This key has the following values:
SUBKEY | VALUE | DESCRIPTION |
|---|---|---|
Driver | C:\Simba\SimbaEngineSDK\10.3\Examples\Source\Quickstart\Bin\ Windows_VS2022\debug64md\QuickstartDSIIODBC64.dll | The location of the driver DLL. NOTE: This is the same as above from “Build the Sample ODBC Driver” |
Setup | Same as above. NOTE: For Simba the Setup DLL is the same as the Driver DLL. | Same as above |
Beskrivning | Sample [32|64]-bit SimbaEngine QuickStartDSII | A description of the driver |
View the Data Source Name (DSN)
The Windows ODBC Data Source Administrator can be used to view the DSNs for the QuickStart driver. To do so we’ll follow the steps below.
Open the correct version of the Windows ODBC Data Source Administrator. For our 64-bit driver on 64-bit Windows we’ll use the default application. Click Control Panel > Administrative Tools > Data Sources (ODBC).
In the ODBC Data Source Administrator click the System DSN tab
Scroll through the list of System Data Sources select the DSN (for example QuickStartDSII) then click Configure. The Data Source Configuration window opens displaying the data source name description and the data directory.
When finished looking at the configuration values click Cancel to close the Data Source Configuration window.
Connect to the Data Store
To connect to the data store and test the QuickStart driver any ODBC application can be used. This section shows how we’ll use the is a simple tool which gives you full control over what ODBC API calls are made. It is included in the Microsoft Data Access (MDAC) 2.8 Software Development Kit (SDK). To connect to the data store using the QuickStart driver we will:
Navigate to the folder containing the ODBC Test application by default: C:\Program Files (x86)\Microsoft Data Access SDK 2.8\Tools
Navigate to the folder that corresponds to the driver’s architecture: amd64 in our case.
Click one:
exe to launch the ANSI version
OR exe to launch the Unicode version. IMPORTANT: It is critical to run the correct version of the ODBC Test tool for ANSI or Unicode and 32-bit or 64-bit.
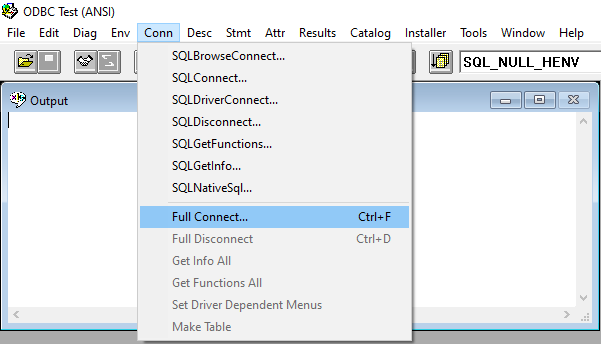
In the ODBC Test tool, click Conn > Full Connect. The Full Connect window opens.
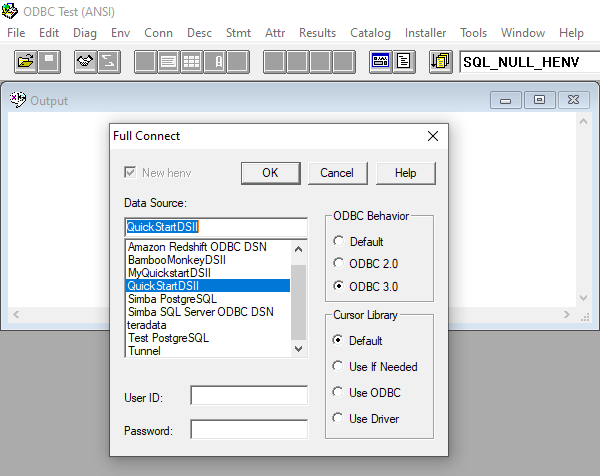
In the Full Connect dialog select QuickStartDSII from the list of data sources and then click OK.
In the ODBC Test window, enter.
SELECT * from EMPClick

and

to output a simple result set. The results are displayed in the window.
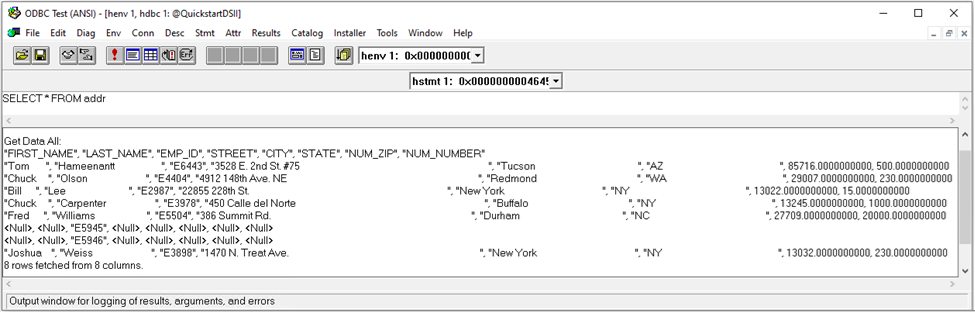
We have successfully built and used the QuickStart driver to connect to the sample data store and retrieve data. This verifies that the installation and development environment are properly configured. Related Links: Testing Your SimbaEngine SDK ODBC Driver with ODBC Test
Step 2. Use the sample driver as a template to create a custom ODBC driver
With your QuickStart sample driver built and tested we will create build and test a custom driver by copying the QuickStart driver.
Set Up a Custom ODBC Driver Project
We will create a new project directory because if we simply modify the sample project files we can experience the following issues:
All the changes will be lost when a new version of the SDK is installed.
We will lose our frame of reference for debugging.
There may be times for debugging purposes that we will need to see if the same error occurs using the sample drivers. If we have modified the sample drivers this won’t be possible.
To set up our custom project we will execute the following sequence of steps:
In Windows Explorer copy the following directory and paste it to the same location:
C:\Simba\SimbaEngineSDK\10.3\Examples\Source\QuickStartwhere C:\Simba is the SimbaEngine SDK installation directory. This will create a new directory called QuickStart - Copy.Rename the directory to Bamboo.
Rename the file Bamboo > Source > QuickStartDSII_VS2022.vcxproj. This is the project file for the custom ODBC driver.
Rename the .sln This is the solution file for the custom ODBC driver.
Using a text editor, open the project file .vcxproj and replace every instance of QuickStartDSII in the source code with Bamboo.
Save and close the file .vcxproj.
Using a text editor, open the solution file .sln and replace every instance of QuickStartDSII in the source code with Bamboo.
Change any references to the project file to Bamboo.vcxproj.
Save and close the file.
To build the custom ODBC driver, we will:
Launch Microsoft Visual Studio 2022.
Click File > Open > Project/Solution.
Navigate to C:\Simba\SimbaEngineSDK\10.3\Examples\Source\Bamboo\Source and open the Bamboo.sln file where Bamboo is the renamed project.
Click Build > Configuration Manager; make sure that the active solution configuration is “Debug_MTDLL” and the active solution platform is x64 then click Close.
Click Build > Build Solution to build the driver. This builds the “Debug_MTDLL” version of the custom ODBC driver and places the DLL in the following location:
C:\Simba\SimbaEngineSDK\10.3\Examples\Source\Bamboo\Bin\Windows_VS2022\debug64mdMake sure the Output window is displayed. Select Debug > Windows > Output.
When the project for the custom ODBC driver is successfully built, the following “TODO” messages appear in the Output window along with the build information: TODO #1: Construct driver singleton. TODO #2: Set the driver properties. TODO #3: Set the driver-wide logging details. TODO #4: Set the connection-wide logging details. TODO #5: Check Connection Settings. TODO #6: Establish A Connection. TODO #7: Create and return your Metadata Sources. TODO #8: Open A Table. TODO #9: Register Messages xml file for handling by DSIMessageSource. TODO #10: Set the vendor’s name which will be prepended to error messages. We will modify the source code for each of the TODO messages in the sections that follow.
Update the Windows Registry
The Data Source Name (DSN) and driver settings for the custom ODBC driver are configured in the Windows Registry. The custom driver configuration is similar to the QuickStart driver configuration described in Examine the Windows Registry. The SimbaEngine SDK includes .reg files that can be used to modify the custom ODBC driver and create the driver's registry keys. We will execute the following steps to update the Windows Registry:
In Microsoft Visual Studio or another text editor, navigate to the following directory: C:\Simba\SimbaEngineSDK\10.3\Examples\Source\Bamboo\Source
Open the following file for the 64-bit ODBC driver on 64-bit Windows: "SetupMyQuickStartDSII-64on64.reg".
In the file, replace [INSTALL_DIRECTORY] with the SimbaEngine SDK installation directory. Use double backslashes in the path. Our example: With the SimbaEngine SDK installation directory C:\Simba, replace all instances of [INSTALL_DIRECTORY] with C:\\Simba.
Change all instances of MyQuickStart to Bamboo, the name of our custom ODBC driver. The following changes will be made:
Under [HKEY_LOCAL_MACHINE\SOFTWARE\ODBC\ODBC.INI\ODBC Data Sources] the key,
"BambooDSII"="BambooDSIIDriver""Driver"="BambooDSIIDriver"[HKEY_LOCAL_MACHINE\SOFTWARE\ODBC\ODBC.INI\BambooDSII]
Under [HKEY_LOCAL_MACHINE\SOFTWARE\ODBC\ODBCINST.INI\ODBC Drivers], the key
"BambooDSIIDriver"="Installed"[HKEY_LOCAL_MACHINE\SOFTWARE\ODBC\ODBCINST.INI\BambooDSIIDriver]
Update "Setup" with the path to the custom driver DLL.
Update "Driver" with the path to the custom driver DLL.
Replace every other instance of
QuickStartin the file withBambooexcept for the DBF=path. This is the path to the sample database included with the SimbaEngine SDK:"DBF"="C:\\Simba\\SimbaEngineSDK\\10.3\\Examples\\Databases\\Quickstart"Click Save and close the file.
NOTE: Some of the registry settings in this .reg file are used for Client - Server configuration. These can be removed when not developing a driver for Client - Server deployment, To import the configuration settings into the Windows Registry:
Open regedit.exe, click File > Import, navigate to the registry file that we modified and then click Open. A message indicating that the keys and values have been successfully added to the registry is displayed.
To verify the Data Source Name for the new project, see View the Data Source Name (DSN).
We will now use this project as a framework to create the custom ODBC driver.
Debug the Custom ODBC Driver
We can use the Visual Studio debugger to step through our custom ODBC driver code in order to gain a better understanding of its functionality. This section explains how we can use the application to connect to the custom ODBC driver then use Visual Studio debugger to step through the driver code. To open the ODBC Test application:
Navigate to the folder containing the ODBC Test application by default: C:\Program Files (x86)\Microsoft Data Access SDK 2.8\Tools
Navigate to the folder that corresponds to our machine’s architecture: amd64.
Click one:
odbcte32.exe to launch the ANSI version
Or, odbct32w.exe to launch the Unicode version.
IMPORTANT: It is important to run the correct version of the ODBC Test tool for ANSI or Unicode and 32-bit or 64-bit. To attach the Visual Studio debugger to the ODBC Test process, we’ll complete the following steps:
In Microsoft Visual Studio, click Debug>Attach to Process.
In the Attach to Process window, select the ODBC test process launched in the previous step, and then click Attach. The process name will be either exe or odbct32w.exe.
Add a breakpoint in cpp, on the function DSIDriverFactory(). This function runs as soon as the Driver Manager loads the ODBC driver.
In the ODBC Test tool, select Conn> Full Connect. The Full Connect window opens.
Select the data source from the list of data sources and then click OK.
The Visual Studio debugger hits the breakpoint created at DSIDriverFactory().
To continue running the program, select Debug>Continue. The focus returns to the ODBC Test
In the ODBC Test window, enter SELECT * from EMP.
Click
and
to output a simple result set.
This step verifies that our custom ODBC driver, based on the QuickStart project, is correctly installed, and configured, and that the development system is properly set up. Related Links: ODBC Troubleshooting How to Enable Driver-manager Tracing | Testing Your SimbaEngine SDK ODBC Driver with ODBC Test
Enable Logging
To gain a better understanding of how the custom OBDC driver works, logging can be turned on. After enabling logging, close then re-open ODBC Test. The application needs to re-load the driver for the logs to be generated. You can then perform a query and find the corresponding details in the log files.
Step 3. Make a connection to the data store
Next, we will authenticate the user against the Bamboo data store and establish a connection with Bamboo.
Finding the TODO messages
As noted in the previous section, when the custom project is built, TODO messages display in the Output window. To rebuild the whole solution, we’ll select Build > Rebuild Solution. (If the Output window is not open, select Debug > Windows > Output.) Double click a TODO message to jump to the relevant section of code.
Set the Configuration Branding
The DSIDriverFactory() implementation in Main_Windows.cpp is the main entry point that is called from Simba’s ODBC layer to create an instance of the DSI implementation. This method is called as soon as the Driver Manager calls LoadLibrary() on the ODBC driver DLL. We will construct the driver singleton as follows:
In the custom ODBC driver project, we double-click the TODO #1 Construct driver singleton message to jump to the relevant section of code. The Main_Windows.cpp file opens.
Look at the DSIDriverFactory() implementation to rebrand the driver name and the company name. This change affects the location in the Windows Registry where the driver values are looked up:
Find the line
SimbaSettingReader::SetConfigurationBranding(DRIVER_WINDOWS_BRANDING);Right click DRIVER_WINDOWS_BRANDING and select Go to Definition. The file “QuickStart.h” opens. NOTE: The file name might have a different case, for example “QuickStart.h” or “Quickstart.h”.
In the line #define DRIVER_WINDOWS_BRANDING "Simba\\QuickStart", we’ll keep Simba as our company name and change QuickStart to Bamboo. EXAMPLE: If DRIVER_WINDOWS_BRANDING is set to "Simba\\QuickStart", then the base path for values in the Windows Registry is HKLM\SOFTWARE\Simba\QuickStartIfIf the DSII is compiled as a driver, it will use “\Driver” as a suffix. If the DSII is compiled as a server, it will use “\Server” as a suffix. Therefore, a 64-bit driver would use the full path of HKLM\SOFTWARE\Simba\QuickStart\Driver to look up the registry keys such as ErrorMessagesPath.
Click Save.
Set the Driver Properties
To set the driver properties, we will:
Double click the TODO #2 Set the driver properties message to jump to the relevant section of code. The cpp file opens.
Go to the method SetDriverPropertyValues(), where the general properties for the driver are set. Change the properties described below:
PROPERTY | DESCRIPTION |
|---|---|
DSI_DRIVER_DRIVER_NAME | Set this property to the name of the driver (the same name used to replace QuickStartDSII). This is the driver name that is shown to the application. |
Set Logging Details
In this section, we’ll set the driver-wide and connection-wide logging. To set logging details, we’ll execute the following instructions:
Double click the TODO #3 Set the driver-wide logging details message to jump to the relevant section of code.
Change the “quickstart_driver.log” file name.

Double click the TODO #4 Set the connection-wide logging details message to jump to the relevant section of code.
Change the connection log’s file name. Under default behavior this is routed to the driver logs. If you want to log connections differently you need to override the QSConnection::GetLog() function

Click Save All
NOTE: By default, the QuickStart driver maintains two kinds of log files: one for all driver-based calls and one for each connection created. These sections can be updated if fine granularity in logging is not required. Instructions to enable logging can be found here.
Check Connection Settings
When the Simba ODBC layer is given a connection string from an ODBC-enabled application, the Simba ODBC layer parses the connection string into key-value pairs. The entries in the connection string and the DSN are then sent to the QSConnection::UpdateConnectionSettings() function for validation.
EXAMPLE: The following is an example of a connection string that specifies what Data Source we're trying to connect to and what credentials we want to connect with.
<ConnectionString>DSN=TestDSN;
DBCNAme=192.168.1.1;
UID=username;
PWD=password;
CharacterSet=UTF8;
DefaultDatabase=testDatabase</ConnectionString>
If entries of the connection string overlap entries from the DSN, then the connection string will override parameters from the DSN. To pass additional parameters to the DSII, new parameters and new entries can be added to the connection string and DSN entry respectively. These values will automatically be picked up by the SDK and passed through for use by the DSII.
UpdateConnectionSettings() receives all the incoming connection settings that are specified in the DSN that was used to establish the connection. The role of this function is to ensure that all required, and any optional, settings are present. Note that actual data validation of the settings should be done in the Connect() function.
EXAMPLE: The connection string “DSN=QuickStart;UID=user;” will be broken down into key value pairs and passed in via the DSIConnSettingRequestMap parameter. In this case that map would contain two entries: {DSN, QuickStart} and {UID, user}. If a DSN was specified, then the DSN value is removed from the map and any entries that are stored in the preconfigured DSN are inserted into the map. Once the map has been created with all the key-value pairs from the connection string and DSN, this map is passed down to the DSII.
To check the connection settings for the custom driver, we’ll do the following:
Double click the TODO #5 Check Connection Settings message to jump to the relevant section of code.
Modify the UpdateConnectionSettings() function to validate that the settings (key-value pairs) in the DSIConnSettingRequestMap are sufficient to create a connection. Any settings not present should be added to the DSIConnSettingResponseMap parameter. We recommend using the VerifyRequiredSetting() or VerifyOptionalSetting() functions to perform this verification. These functions also add missing settings to DSIConnSettingResponseMap. EXAMPLE: The VerifyRequiredSetting() method is contained by the UpdateConnectionSettings().
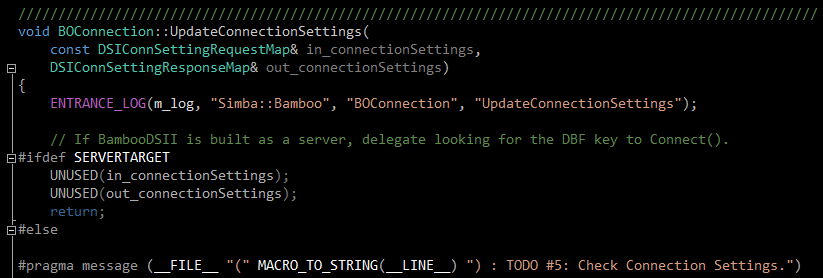
NOTE: The connection settings listed in UpdateConnectionSettings() are specific to the QuickStart driver. A custom driver will require different settings. The QuickStart driver requires a single key in the DSN, DBF. The other keys are optional. EXAMPLE: The Bamboo driver verifies that the settings contained in in_connectionSettings are sufficient to create a connection by using the following VerifiedRequiredSetting and VerifyOptionalSetting helper functions
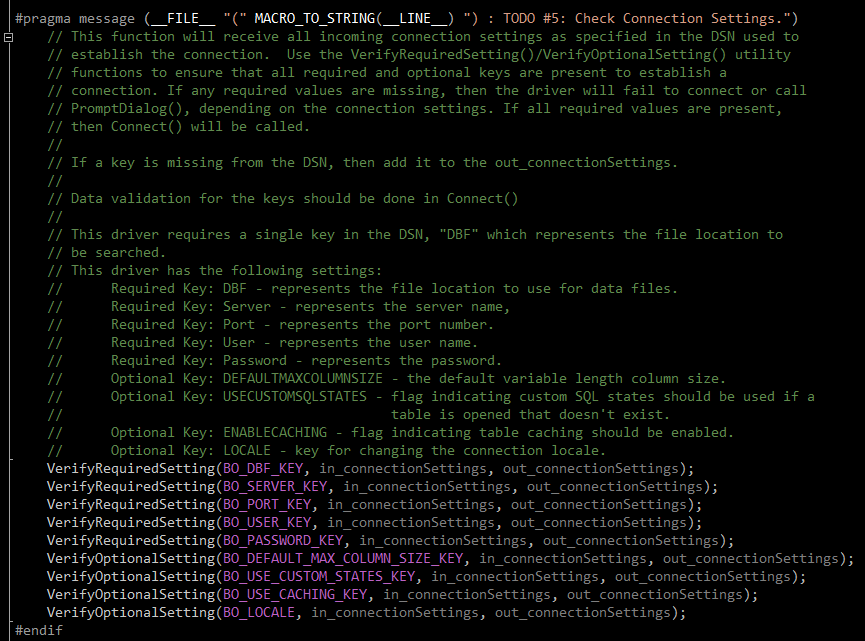
If any required values are missing, the driver will either fail to connect, or will call PromptDialog(), depending on the connection settings. If all required values exist, then Connect() will be called.
If any of the values received are invalid, then the code should throw an ErrorException seeded with DIAG_INVALID_AUTH_SPEC.
Manually Verifying the Connection Settings
Settings can also be verified manually. If the entries within in_connectionSettings are not sufficient to create a connection, then the driver can ask for additional information from the ODBC-enabled application by manually specifying the additional, required settings in out_connectionSettings. If there are no further entries required, simply leave out_connectionSettings empty.
Establish a Connection
The SimbaEngine SDK calls UpdateConnectionSettings() before calling QSConnection::Connect(). Once QSConnection::UpdateConnectionSettings() returns out_connectionSettings without any required settings—if there are only optional settings, a connection can still occur—then the Simba ODBC layer calls QSConnection::Connect(), passing in all the connection settings received from the application. During Connect(), the driver should have all the settings necessary to make a connection as verified by UpdateConnectionSettings(). We can use the utility functions GetRequiredSetting() and GetOptionalSetting() to request the required and optional settings for our connection and attempt to make an actual connection. To establish a connection, we will:
Double click the TODO #6 Establish A Connection message to jump to the relevant section of code.
For Bamboo, we need to add code that authenticates the user against the Bamboo server using the information provided within the in_connectionSettings parameter. Use GetRequiredSetting() and GetOptionalSetting() to access the settings in the map.
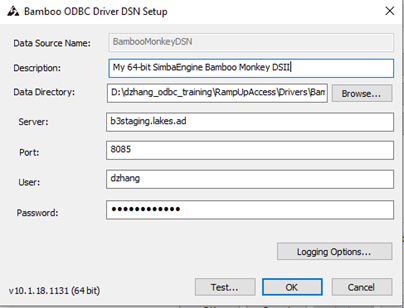
Add validation to our custom ODBC driver. If authentication fails, throw an ErrorException seeded with DIAG_INVALID_AUTH_SPEC. Note that the sample ODBC driver does not perform validation.
We have successfully authenticated the user against our data store and have established a connection.
Step 4. Create and return metadata sources
In this section we will make the code changes necessary so that an ODBC-enabled application can connect to the driver and retrieve type metadata from Bamboo.
Overview of SQL Catalog Functions
The custom ODBC driver uses metadata sources, provided by the SimbaEngine SDK, to handle SQL catalog functions. ODBC applications need to understand the structure of a data store in order to execute SQL queries against it. This information is provided using catalog functions. For example, an application might request a result set containing information about all the tables in the data store, or all the columns in a particular table. Each catalog function returns data as a result set. Most ODBC-enabled applications require a driver to implement the following catalog functions. It is possible to implement additional catalog functions in the custom driver if required.
CATALOG FUNCTION | DESCRIPTION |
|---|---|
SQLGetTypeInfo | Returns information about data types supported by the data source. |
SQLTables (CATALOG_ONLY) | If CatalogName is SQL_ALL_CATALOGS and SchemaName and TableName are empty strings, the result set contains a list of valid catalogs for the data source. (All columns except the TABLE_CAT column contain NULLs.) |
SQLTables (SCHEMA_ONLY) | If SchemaName is SQL_ALL_SCHEMAS and CatalogName and TableName are empty strings, the result set contains a list of valid schemas for the data source. (All columns except the TABLE_SCHEM column contain NULLs.) |
SQLTables (TABLE_TYPE_ONLY) | If TableType is SQL_ALL_TABLE_TYPES and CatalogName, SchemaName, and TableName are empty strings, the result set contains a list of valid table types for the data source. (All columns except the TABLE_TYPE column contain NULLs.) |
SQLTables | Returns the list of table, catalog, or schema names, and table types, stored in a specific data source. |
SQLColumns | Returns a list of columns in one or more tables. |
Example: Using Catalog Functions with the QuickStart driver
In the ODBC Test application, connect to the QuickStart driver.
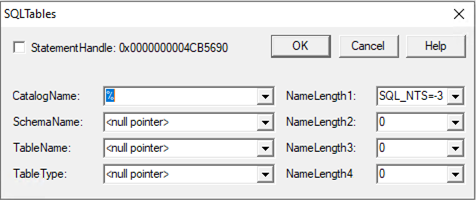
To send the SQLTables (CATALOG_ONLY) catalog function, select Catalog > SQLTables.
Enter SQL_ALL_CATALOGS for the CatalogName, then select the correct value for NameLength1. For example:
Click OK.
Select OK. to retrieve the results.
The following list of valid catalogs (containing only the “DBF” catalog) for the QuickStart data source is returned:
GetDataAll:
"TABLE_CAT",TABLE_SCHEM","TABLE_NAME","TABLE_TYPE","REMARKS"
"DBF",<Null>,<Null>,<Null>,<Null>
1 row fetched from 5 columns
For more information on SQL catalog functions, see: Catalog Functions
Implementing Metadata Sources to Handle Catalog Functions
SQL catalog functions are represented in the DSI by metadata sources; there is one metadata source for each of the catalog functions. QSDataEngine::MakeNewMetadataTable() is responsible for creating the metadata sources. Metadata sources are used to return the catalog metadata about a data store to the ODBC application for the ODBC catalog functions. Double click the TODO #7 Create and return your Metadata Sources message to jump to the relevant section of code. There is one metadata source for each of the catalog functions. For example, when the application calls SQLColumns(), a DSI_COLUMNS_METADATA source is created to return the list of columns in one or more tables in the data store. Each ODBC catalog function is mapped to a unique DSIMetadataTableId, which is then mapped to an underlying MetadataSource that the driver implements and returns. Each MetadataSource instance is responsible for the following:
Creating a data structure that holds the data relevant for the custom data store, in the class constructor.
Navigating the structure on a row-by-row basis, in the Move() method.
Retrieving data in the GetData() method. (See Data Retrieval for a brief overview of data retrieval.)
Required Metadata Sources
All custom ODBC drivers must implement the following metadata sources, as they are required by ODBC applications:
METADATA SOURCE | DESCRIPTION |
|---|---|
DSI_TABLES_METADATA | List of all tables defined in the data source. This source is constructed via the QSMetadataHelper and SQL Engine. |
DSI_CATALOGONLY_METADATA | List of all catalogs defined in the data source, if catalogs are supported. This source is constructed via the QSMetadataHelper and SQL Engine. |
DSI_SCHEMA_METADATA | List of all schemas defined in the data source. This source is constructed via the QSMetadataHelper and SQL Engine. QuickStartDSII does not support schemas. |
DSI_TABLETYPEONLY_METADATA | List of all table types (TABLE, VIEW, SYSTEM) defined within the data source. This source is constructed via the QSMetadataHelper and SQL Engine. |
DSI_COLUMNS_METADATA | List of all columns defined across all tables in the data source. This source is constructed via the QSMetadataHelper and SQL Engine. |
DSI_TYPE_INFO_METADATA | List of the supported types by the data source. This means the actual types that can be stored in the data source, not necessarily the types that can be returned by the driver. For instance, a conversion may result in a type being returned that is not stored in the data source. |
Most catalog types are created using the metadata helper in conjunction with the SQL Engine.
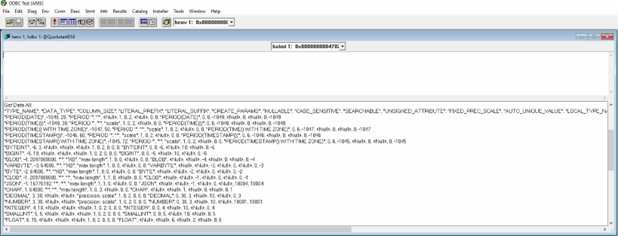
Handling DSI_TYPE_INFO_METADATA
The underlying ODBC catalog function SQLGetTypeInfo is handled as follows:
When called with DSI_TYPE_INFO_METADATA, QSDataEngine::MakeNewMetadataTable() will return an instance of QSTypeInfoMetadataSource().
The QuickStart sample driver supports a large number of data types. For the Bamboo driver, we will start with a very simple list of data types and expose anything more complex as WVARCHAR:
SQL_BIGINT
SQL_FLOAT
SQL_BIT (Used for Boolean)
SQL_WVARCHAR
For Bamboo, we modified QSTypeInfoMetadataSource::PrepareType() to only list support for these data types. You would make similar changes based on the data types in your underlying data source.
Handling the Other Metadata Sources
The other ODBC catalog functions, including SQLTables (CATALOG_ONLY), SQLTables (TABLE_TYPE_ONLY), SQLTables (SCHEMA_ONLY), SQLTables and SQLColumns, are handled automatically by the metadata helper class. When these functions are called with any other DSIMetadataTableId, QSDataEngine::MakeNewMetadataTable() should return null. Returning null tells the SimbaEngine SDK to use the metadata helper class returned via QSDataEngine::CreateMetadataHelper() along with some default MetadataSources to create the data source metadata. You can also choose to return a DSIMetadataSource if you don’t want to use the metadata helper. Change the following methods:
QSMetadataHelper::QSMetadataHelper() The example constructor retrieves a list of the tables in the data source. Modify this method to load the tables defined in your data store.
QSMetadataHelper::GetNextTable() In the QuickStart driver, this method returns the next table in the data source. Modify this method to retrieve the next table from your data store.
The DSIExtMetadataHelper class works by retrieving the identifying information for each table and then opening the table via QSDataEngine::OpenTable(). After QSTable is implemented, the correct metadata will be returned for all the tables and columns in our data source. We can now retrieve type metadata from our data store.
Step 5. Enable data retrieval
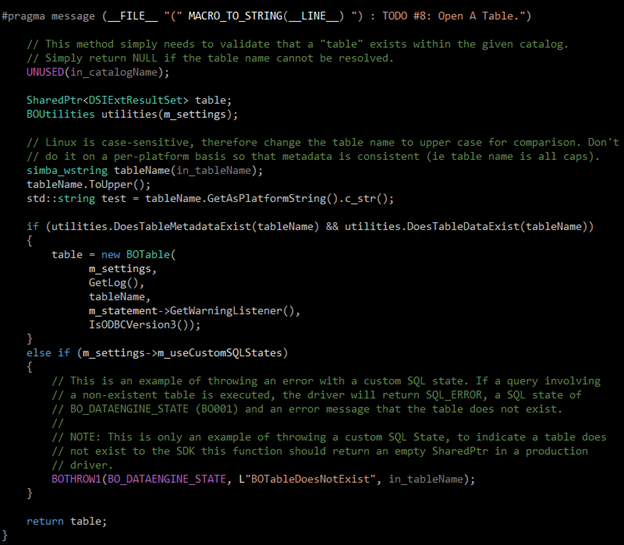
In this section, we will execute queries and retrieve data from the Bamboo data store. QSDataEngine::OpenTable() is the entry point where the Simba SQL Engine requests that tables involved in the query be opened. It is called during the preparation of a SQL statement. NOTE: The SQL Engine component of the SimbaEngine SDK allows applications to execute SQL commands on data stores that are not SQL-capable. Click on TODO #8: Open A Table to jump to the relevant section of code. QSTable is an implementation of DSIExtSimpleResultSet, an abstract class that provides basic forward-only result set traversal. The main role of QSTable is to translate the stored data from the native data format into SQL Data types. The QuickStart sample driver is implemented for Tabbed Unicode Files. The sample driver translates the text from UTF16-LE strings into the SQL Data types defined for each column within the configuration dialog. In the QuickStart driver, QSTable uses a TabbedUnicodeFileReader, which provides an interface to navigate between lines within a Unicode text file. This class preprocesses each row in the file to determine the starting file offset of each column in the row. Its GetData method takes a columnIndex and uses it to calculate the exact position in the file where the column’s data resides. The method repositions the file and retrieves the data as if from a byte-buffer. The following sections explain how we will implement data retrieval in the custom ODBC driver.
Modify the OpenTable Method
The QSDataEngine::OpenTable() method is called during the preparation of a SQL statement. We’ll modify this method to check that the supplied catalog, schema and table names are valid and correspond to a table defined in our data store. If the inputs are not valid, return null to indicate that the table does not exist. If the inputs are valid, return a new instance of QSTable.
Example: The DoesTableMetadataExist() and DoesTableDataExist() are the functions responsible for checking if the table and its metadata exist. For our project, we modified the DoesTableMetadataExist() to check for “.JSON” files. Originally, it searched for “.TXT” files.
We use these local JSON files to define the column names and types the driver will expose for each attribute in a specific endpoint. Depending on your data source, you might make a REST or other network call to get this kind of information from the server instead.
{
"endPoint": "project",
"columns": [
{"colName": "KEY", "colType": 12},
{"colName": "NAME", "colType": 12},
{"colName": "DESCRIPTION", "colType": 12},
{"colName": "LINK-HREF", "colType": 12},
{"colName": "LINK-REL", "colType": 12}
]
}
Modify QSTable
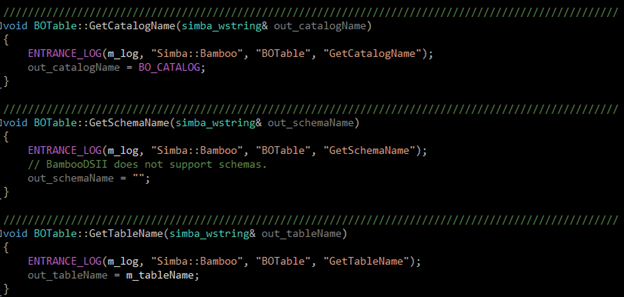
We’ll now modify QSTable so that it can work with our data store. Return the catalog, schema and table names for our table. Make the following changes to your custom ODBC driver so that it can work with your data store: QSTable::QSTable() : Modify the constructor to take in the catalog, schema and table names and save them in member variables. QSTable::GetCatalogName() : Returns QS_CATALOG QSTable::GetSchemaName() : Returns simba_wstring() (because it does not support schemas) QSTable::GetTableName() : Returns m_tableName EXAMPLE: In our case, we’ll change QS_CATALOG to BO_CATALOG, which is a constant string “BAMBOO” which the driver always returns as the catalog name. Many applications expect data sources to support catalogs, which is why we always return something here.
Return the columns defined for your table
Modify QSTable::InitializeColumns() so that, for each column defined in the table, you define a DSIResultSetColumn in terms of SQL types.
EXAMPLE: Pseudo code for a custom QSTable::InitializeColumns()
For Each Defined Column
 {
AutoPtr columnMetadata(new DSIColumnMetadata());
columnMetadata->m_catalogName = m_catalogName;
columnMetadata->m_schemaName = m_schemaName;
columnMetadata->m_tableName = m_tableName;
columnMetadata->m_name = //column name
columnMetadata->m_label = //localized column name
columnMetadata->m_unnamed = false;
columnMetadata->m_charOrBinarySize = //the length in bytes
columnMetadata->m_nullable = DSI_NULLABLE;
// Change the first parameter of this method to the SQL
// type that maps to your data store type.
SqlTypeMetadata* sqlTypeMetadata =
SqlTypeMetadataFactory::MakeNewSqlTypeMetadata(
SQL_WVARCHAR,
TDW_BUFFER_OWNED
);
columns->AddColumn(
new DSIResultSetColumn(
sqlypeMetadata,
columnMetadata.Detach()
)
);
}
m_columns.Attach(columns.Detach());
Implement Navigation
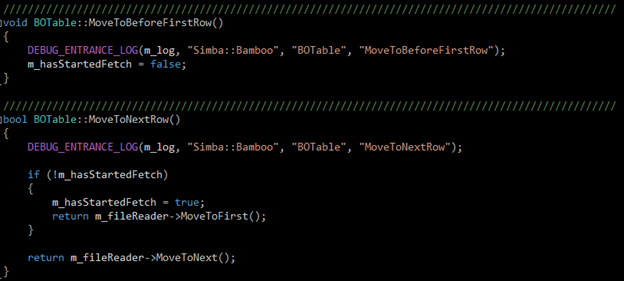
The methods listed below are responsible for navigating a data structure containing information about one table in the data store and retrieving data from the table. We’ll modify these methods for our data store:
QSTable::MoveToBeforeFirstRow()
QSTable::MoveToNextRow()
QSTable::RetrieveData
In a custom implementation:
It is best to implement a streaming interface for the data in the table within the data store.
Provide the ability to navigate forward from one table row to the next.
Provide the ability to navigate across columns within the row.
Provide the ability to read the data associated with the current row and column combination.
EXAMPLE: MoveToBeforeFirstRow – indicates that the driver has not started fetching data yet. MoveToNextRow – If the driver hasn’t started fetching yet, it moves to the first row. Otherwise, it will move to the next row from where it currently is. You will need to decide when to fetch more data from your server in these operations. Typically, you would fetch a certain number of rows from the server at a time, say 100, and repeat this as those rows have been moved through.
Modify the DoCloseCursor Method QSTable::DoCloseCursor() is a callback method called from Simba SQL Engine to indicate that data retrieval has completed, and that we may now do any tasks related to closing the connection to our data store. This completes the core functionality of the driver! You can now do a full test in Tableau or Power BI and list tables as well as return data from tables! Now we need to do a bit of clean up and modify our connection dialog.
Step 6. Rebrand and rename the custom OBDC driver
In this final section, we will conclude our custom build by renaming and rebranding our driver.
Rebrand Error Messages
Error messages sent by the driver are visible to applications and customers. In the QuickStart sample driver, error messages are branded with QuickStart, QS, and Simba. In this section, we will explain how to rebrand the error messages to reflect the custom driver name and the company name. All the error messages used within the DSI implementation are stored in a file called “QSMessages.xml”. To configure error messages, we will change QuickStart, QS, and Simba to Bamboo, BO, and Simba respectively using the following steps:
Rename the xml file to reflect the name of the company or the custom ODBC driver.
Double click the TODO #9 Register the QSMessages.xml file for handling by DSIMessageSource message to jump to the relevant section of code.
Update the line associated with the TODO to match the new name of the xml file.
Open the xml file and change all instances of the following items:
Change the letters QS to an appropriate two-letter abbreviation.
Change the word QuickStart to an appropriate name for the custom driver. For each exception thrown within the custom DSI implementation, change the parameters to match the custom driver name. This rebrands the error messages to reflect the name of the driver.
Double click the T to go to the relevant section of code.
The vendor name is prepended to all error messages that are visible to applications. As explained in the code comments, change the vendor name from Simba to an appropriate name for your company. In our example, we are keeping the Simba name.
Rebrand the Custom ODBC Driver
All the TODOs in the QuickStart sample driver project are finished, and the custom driver is rebranded and retrieving data from our data store. To complete the custom driver, we’ll add the following functionality:
Rename all files and classes in the project to have the two-letter abbreviation chosen as part of TODO #9—i.e., BO.
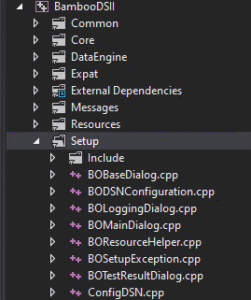
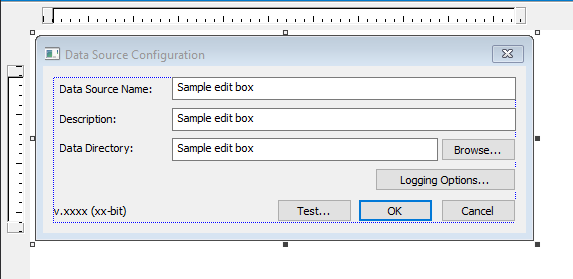
Create a driver configuration dialog. This dialog is presented to the user when the ODBC Data Source Administrator is used to create a new ODBC DSN or configure an existing one. The QuickStart driver project contains an example ODBC configuration dialog under the Setup folder in the QuickStart driver project. EXAMPLE: The “Setup” folder contains the files needed to be modified for the dialog windows
This is the base dialog box.
After modification, it has text boxes for username, password, server, and port.
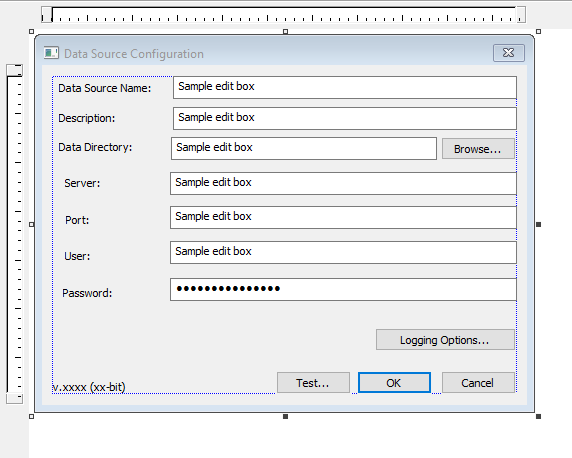
To see the driver configuration dialog that was created in the previous step, run the ODBC Data Source Administrator, open the Control Panel, select Administrative Tools, and then select Data Sources (ODBC). If the Control Panel is set to view by category, then Administrative Tools is located under System and Security.
IMPORTANT: If you are using 64-bit Windows with 32-bit applications, you must use the 32-bit ODBC Data Source Administrator. You cannot access the 32-bit ODBC Data Source Administrator from the Start menu or control panel in 64-bit Windows. To access a 32-bit ODBC Data Source Administrator from a 64-bit machine, run C:\WINDOWS\SysWOW64\odbcad32.exe.
Slutsats
The Bamboo custom driver project demonstrates how the SimbaEngine SDK can provide a complete set of components to quickly, easily and cost-effectively implement a driver that meets your data connectivity requirements. It includes all the components needed to deploy an ODBC, JDBC, ADO.NET, or OLE DB driver, for SQL-enabled and non-SQL data stores, as a single tier or client/server, standards-based solution. Using our comprehensive documentation, an array of pre-defined functionality can be included to easily deploy a fully optimized driver suited to specific requirements.